Thursday, August 29, 2019

writeDiagnostics in OAF


pagecontext.writeDiagnostics is a combinations two different objects. 

writeDiagnostics  is the simple method in the OAF to show/create log messages and pagecontext is the OAF class object which helps to execute the writeDiagnostics method in the OAF controller.

 to add logging / debug messages in Oracle Application Framework.

to write log / debug statements in Controller (CO), Application Module Implementation class(AM), ViewObject and ViewObject Row Implementation class (VO) and Entity Object Implementation class (EO) in OA Framework.

OA Framework has a method writeDiagnostics() which can be used from anywhere in the above mentioned classes. 

This methods are published by oracle.apps.fnd.framework.webui.OAPageContext and oracle.apps.fnd.framework.server.OADBTransaction (for example, if you want to make logging calls in a UI controller, use OAPageContext. 

If you want to make logging calls from an application module, use OADBTransaction).  Below give are the example to show how to call these methods in different places.

Here below I will explain in detail about pagecontext.writeDiagnostics  in oaf and how we can use this in our OAF Pages.
 

To view log mesages, select the Diagnostics global button from any page (this global button is configured as part of the standard global menu added to each page; the display of this menu item is controlled by the profile option FND: Diagnostics (FND_DIAGNOSTICS)) 

Diagnostics can be enabled at various levels:
  • Show Log - directs you to the Oracle Applications Manager where you can view a "snapshot" of your Oracle E-Business Suite system.
  • Show Log on Screen - allows you to specify a log level and display Java log messages for a particular HTTP Request-Response at the end of the current page. For additional information about this feature, refer to the section titled "Using Logging to Screen" in the Oracle Application Framework Developer's Guide chapter called How to Configure Logging of the Oracle E-Business Suite Supportability Guide, available on the Applications Release 12 Online Documentation CD.
  • Set Trace Level - displays the Set Trace page where you can specify the level of information to collect in a database trace. 
  • Show Pool Monitor - displays the Application Pool Monitor where you view different aspects of runtime and configuration information about the JVM.

Here we are discussing only about the option "Show Log on Screen".

The debug messages can be written in various level:

  • Statement (1)
  • Procedure(2)
  • Event(3)
  • Exception (4)
  • Error (5)
  • Unexpected(6)
Depends on which options you choose, the screen will display all the debug messges written on that level or above. I prefer to write the debug messages at the exception level, so if I select the option Exception(4) in the screen, i can see only my debug messages.(most of the standard logging statements are written at Statement(1) level.)
  • From a Controller
if(pageContext.isLoggingEnabled(OAFwkConstants.EXCEPTION))  
 {  
      pageContext.writeDiagnostics(this,"[TestCO]processRequest():- <Log Message Here!!!!!!>",OAFwkConstants.EXCEPTION);  
 } 

  • From AM Impl class
 if(this.isLoggingEnabled(OAFwkConstants.EXCEPTION))   
 {  
      this.writeDiagnostics(this,"[TestAMImpl]testMethod():- <Log Message Here!!!!!!>",OAFwkConstants.EXCEPTION);  
 }  
  • From VOImpl class
 if(this.isLoggingEnabled(OAFwkConstants.EXCEPTION))   
 {  
      this.writeDiagnostics(this,"[TestVOImpl]testMethod():- <Log Message Here!!!!!!>",OAFwkConstants.EXCEPTION);  
 }  
  • From VORow Impl class
 import oracle.apps.fnd.framework.server.OAApplicationModuleImpl;  
 OAApplicationModuleImpl appModule = (OAApplicationModuleImpl)this.getApplicationModule();  
 if(appModule.isLoggingEnabled(OAFwkConstants.EXCEPTION))   
 {  
      appModule.writeDiagnostics(this,"[TestVORowImpl]testMethod():- <Log Message Here!!!!!!>",OAFwkConstants.EXCEPTION);  
 }  
  • From EOImpl class
 import oracle.apps.fnd.framework.server.OADBTransaction;  
 OADBTransaction transaction = this.getOADBTransaction();  
 if(transaction.isLoggingEnabled(OAFwkConstants.EXCEPTION))   
 {  
      transaction.writeDiagnostics(this,"[TestEOImpl]testMethod():- <Log Message Here!!!!!!>",OAFwkConstants.EXCEPTION);  
 }  
    If you are running from Jdeveloper, you could just use the SOP statements.
     System.out.println("[TestCO]processRequest():- <Error Message Here!!!!!!>");  
    

    This is a custom method which I normally use, which is helpful when you want to change the debug levels. This is used in CO, if you want you can write something similar in AM :)
     public void writeLog(OAPageContext pageContext, String message)   
     {  
          if(pageContext.isLoggingEnabled(OAFwkConstants.EXCEPTION))  
          {  
               pageContext.writeDiagnostics(this,message,OAFwkConstants.EXCEPTION);  
          }  
          System.out.println(message);  
     }  


    Complete Details about pagecontext.writediagnostics in oaf

    writeDiagnostics Method

    writeDiagnostics(Object module ,String message,int logLevel);
    module - current module, usually the "this" pointer
    message - message to be included in the log. Limit 4000 characters.
    logLevel - Type of log message. Valid values are (UNEXPECTED,ERROR, EXCEPTION,EVENT,PROCEDURE,STATEMENT,PERFORMANCE)
    If you are using the pagecontext.writediagnostics to see all the OAF pages log message you first need to set this profile at user level.


    FND: Debug Log Level

    OADBTransaction in OAF

    OADBTransaction in oaf is used to perform data base operations in the OAF page. 

    If we want to execute SQL statements in the OAF page controller then we should create the handle of OADBTransaction and with this handle we can able to execute the sql statement in the OAF page. 

    In the similar way , if we want to execute the PLSQL block or database procedures or function in the OAF page then we still need to use this OADBTransaction object of OA framework. 

    Here below we will explain full What is OADBTransaction in oaf and we uses in OAF Controllers.


    TO used OADBTransaction we first need to import its class in the oaf page controller to used in the   controller class file.
    here below is the import class of OADBTransaction.        
    import oracle.apps.fnd.framework.server.OADBTransaction;


    Example : To set Paygelayout region window title and title dynamically based on Lookup

    Write below code in AM.

        public String getWindowTitle(String pFunctionId) 
        {
            String fname=null;
            OADBTransaction dbtxn=getOADBTransaction();
            dbtxn.writeDiagnostics(this,"We are in getWindowTitle Class",6);
            try
            {
            DBTransaction dbtransaction=getDBTransaction();
            String sql="select description FunctionName from fnd_lookup_values_vl fl where lookup_type ='XX_CMN_FILE_UPLOAD' AND fl.enabled_flag = 'Y' AND TRUNC(SYSDATE) BETWEEN NVL (fl.start_date_active,SYSDATE - 1) AND NVL (fl.end_date_active,SYSDATE + 1) and Attribute_category = 'XX_CMN_FILE_UPLOAD' and lookup_code ='" + 
                    pFunctionId + "'";
                java.sql.PreparedStatement sqlpStmt = 
                              dbtransaction.createPreparedStatement(sql, 1);
                ResultSet rs = sqlpStmt.executeQuery();
                if (rs != null) 
                {
                     while (rs.next()) 
                     {
                     fname = new String(rs.getString("FunctionName"));
                     }
                }
            }
            catch (Exception ex) 
            {
                ex.printStackTrace();
            }
            return fname;
        }


    Write Below code in CO

      public void processRequest(OAPageContext pageContext, OAWebBean webBean)
      {
        super.processRequest(pageContext, webBean);
        RCommonUploadAMImpl am=(RCommonUploadAMImpl)pageContext.getApplicationModule(webBean);
        OAPageLayoutBean mainrn=pageContext.getPageLayoutBean();
        String windTitle=am.getWindowTitle("D2D_CNV_011_GBL");
        mainrn.setWindowTitle(windTitle);
        mainrn.setTitle(windTitle);
        

      }

    Wednesday, August 28, 2019

    oracle.apps.fnd.framework.OAException: Could not load application module 'xxmsc.oracle.apps.wsm.TLS.server.AssemblyLotAM'.

    Error while deploying the OAF page in R12.2.4

    Error while deploying the OAF page in R12.2.4

    When I am migrating the objects from R12.1.3 to R12.2.4 I am facing the below error.

    Exception Details.
    oracle.apps.fnd.framework.OAException: Could not load application module 
    'xxmsc.oracle.apps.wsm.TLS.server.AssemblyLotAM'.

    The solution for this is, we need to follow below steps. In R12.2.4 the weblogic server was introduced. We need to create the custom jar files and it must be made available for WebLogic to pick it up.

    Steps
    =====

    Go to the custom path where class file is present

    adcgnjar

    Bounce the oacore

    cd $ADMIN_SCRIPTS_HOME

    ./admanagedsrvctl.sh stop oacore_server1

    ./admanagedsrvctl.sh start oacore_server1

    Bounce the apache

    ./adapcctl.sh stop 

    ./adapcctl.sh start

    Tuesday, August 27, 2019

    Tables that stores the OAF data.

    JDR_UTILS PL/SQL package supports the MDS repository and can be used to query and maintain the repository.


    Now let’s see how, all that is mentioned above, happens.
    MDS repository has 4 tables in all. Just 4 tables? Yes you heard it right it has only 4 tables and that’s it. These 4 tables can manage all the stuff that we have discussed till now.
    These 4 tables are:
    1. JDR_PATHS: Stores the path of the documents, OA Framework pages and their parent child relationship.
    2. JDR_COMPONENTS: Stores components on documents and OA Framework pages.
    3. JDR_ATTRIBUTES: Stores attributes of components on documents and OA Framework pages.
    4. JDR_ATTRIBUTES_TRANS: Stores translated attribute values of document components or OA framework pages.

    How to remove personalization in OAF

    Now we are goin to learn how to remove the personalization in OAF.


    Step1:- Login to oracle application.
    Step2:- Switch to Functional Administrator responsibility.
    Step3:- Click on personalization tab.
    Step4:- For application, Enter the respective application name.
    Step5:- Click on the Personalized Checkbox.
    Step6:- Click Go.
    Step7:- Remove or De-activate your personalization by selecting the personalization level at
                 which you made a particular personalization.

    OR

    Step1:- Login to oracle application.
    Step2:- Switch to Functional Administrator responsibility.
    Step3:- Click on personalization tab.
    Step4:- Click on import/export sub tab menu.
    Step5:- For application, Enter the respective application name.
    Step6:- Provide the document path.
                 To get the path
                Go to sql developer run the following it will give the path.          


    DECLARE
    BEGIN
    jdr_utils.listcustomizations
    (p_document => '/oracle/apps/per/talentprofile/webui/TMEmployeePG');
    END;

     DECLARE
    BEGIN
    jdr_utils.printdocument
    (p_document => '/oracle/apps/per/talentprofile/webui/TMEmployeePG');
    END;


    DECLARE
    BEGIN
    jdr_utils.deletedocument(p_document => ‘/oracle/apps/icx/por/wf/webui/customizations/site/0/ReqLinesNotificationsRN’);
    END;

    Step7:- Click on Go.

    Step8:- select the personalization and delete it.

    Find the Customization's in Back End.


    SELECT path_name,
           path_type,
           last_update_date,
           att_value,
           att_comp_seq,
           att_seq,
           att_name
      FROM jdr_attributes ja, jdr_components jc, jdr_paths jp
     WHERE att_comp_docid = comp_docid AND comp_element = 'customization' --and att_name = 'controllerClass'
           AND path_docid = comp_docid AND att_value LIKE '%xxchr%'

    Custom OAF code deployment to Run edition in 12.2.X

    Steps to deploy custom OAF code to run edition (assuming that custom OAF code is under $JAVA_TOP/xxcust.
    1. Login into instance and source to "Run edition"2. Go to $JAVA_TOP3. Take backup of  customall.jar4. Run adcgnjar command. Just enter adcgnjar and then enter5. Provide DB apps password.6. Then go to $ADMIN_SCRIPTS_HOME and bounce OA core on Weblogicadmanagedsrvctl.sh stop oacore_server1admanagedsrvctl.sh start oacore_server1x

    Page Import Script in OAF

    java oracle.jrad.tools.xml.importer.XMLImporter $JAVA_TOP/oracle/apps/po/requisition/server/RegisterAM.xml -username APPS -password apps -dbconnection "(DESCRIPTION=(ADDRESS=(PROTOCOL=tcp)(HOST=ebs.apps.com)(PORT=1521))(CONNECT_DATA=(SID=vis)))" -rootdir $JAVA_TOP ;


    How to Bounce Apache Server in R12

    To bounce the Apache first connect to server through putty.
     
     
    Now change the directory to INST_TOP 
     
             cd $INST_TOP
             cd admin/scripts
     
    Now run the below commands 
    • adapcctl.sh stop
    • adapcctl.sh start 
    • adacorectl.sh stop
    • adoacorectl.sh start

    Thursday, August 22, 2019

    Deploying OAF Pages Into Oracle Apps

    how to move OAF project files into Apps Server, or OAF deployment, or Registering OAF pages in to Oracle Applications.


    Here we are using both Putty and WINSCP , and let us see how to register OAF page into Apps Server.
    Step 1: Move all Class files or Java files to respective JAVA_TOP.
    If we are moving Java files then we need to compile Java files explicitly in the server using the command.
    JAVAC <Java_file_name.java>
    If we are moving Class files then the compilation is not required, i.e., instead of compilation we can move class files directly.
    Note: The best approach is to move java files into server and compile, so that server side compatibility will be there.
    applmgr$cd $JAVA_TOP

    applmgr$pwd
    /u01/oracle/VIS/fs2/EBSapps/comn/java/classes
    applmgr$cd $JAVA_TOP
    applmgr$pwd
    /u01/oracle/VIS/fs2/EBSapps/comn/java/classes
    Step 2: After finding where exactly the Java top is located move the files into java top, let us see how to move class files, here we are moving class files to the JAVA_TOP using the WinScp
    The below image shows the moving process in WinScp.Drag the folder from left side and drop it on the linux/unix environment:


    Select the folder drag and drop it to the server environment, after that one popup window will come and click on Copy button:


    Import Script in OAF


    In this lesson we are going to see the import script in OAF and how to use import script in oaf.
    The importance of OAF import script is for redirection of pages into MDS directory.
    Let us consider in our project we have one OAF page with the following page link generated.


    OA.jsp?page=/xxstirling/oracle/apps/po/stirlingprj/webui/SearchPG
    So for the above search page see the following import script which we need to perform in putty:
    java oracle.jrad.tools.xml.importer.XMLImporter $JAVA_TOP/oracle/apps/po/requisition/server/RegisterAM.xml -username APPS -password apps -dbconnection "(DESCRIPTION=(ADDRESS=(PROTOCOL=tcp)(HOST=ebs.apps.com)(PORT=1521))(CONNECT_DATA=(SID=vis)))" -rootdir $JAVA_TOP ;


    The above import script is for linux/unix environment but few students might practice in Windows server environment for them the following is the import script for window server environment:
    import D:\Bharath\Softwares\p9879989_R12_GENERIC\jdevhome\jdev\myprojects\xxstirling\
    oracle\apps\po\stirlingprj\webui\SearchPG.xml -rootdir ...(your win server apps rootdir)
    ..\jdevhome\jdev\myprojects -username apps -password apps -dbconnection
     "(DESCRIPTION=(ADDRESS_LIST=(ADDRESS=(PROTOCOL=tcp)(HOST=www.newtonapples.com)(PORT=1521)))(CONNECT_DATA=(SERVICE_NAME=vis)))"
    For each and every page we need to execute the import script in OAF, the below image shows import script execution process i.e., after writing the import script the following is the confirmation it shows in putty:
    Whenever the import script is executed successfully i.e., if the importing file is properly executed then it shows a message called “Import Completed”.


    In the next lesson we are going to see how to create function, creating menu, and attaching menu to Responsibility.

    Creating Function,Menu, and Responsibility in Apps for OAF Pages

    In this lesson we are going to see how to create a function,menu, and responsibility in Oracle Applications for OAF pages.
    Creating Function in Apps:
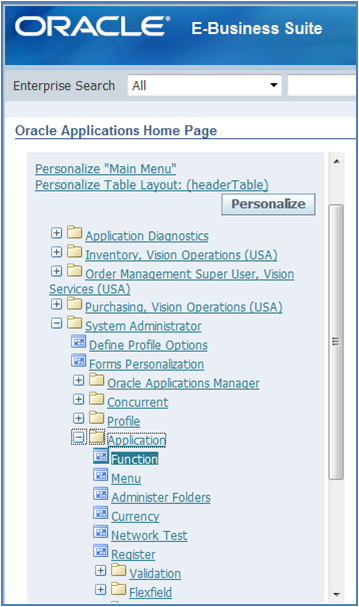
    Select Application Developer or System Administrator to navigate to Function, The below image shows the navigation in System Administrator.
    After selection, then a Function window will get opens, give the Function Name and User Function Name


    Integrate XML Publisher and OAF ?

    Step 1 : XML Publisher Reporting Architecture

    • An XML publisher report consist of a report template designed in RTF or PDF Format and a Data XML file.
    • The template contains the report layout. 
    • During execution the Data XML File is merged with the template to generate a PDF, HTML, EXCEL or RTF report.
    Step 2: Designing the OAF BC4J Data Model.

            
       Using jdeveloper create a ViewObject EmpVO using the below query and associate it to ApplicationModule

    EmpAM.

    SELECT empno,ename,job,mgr,hiredate,comm,deptno FROM emp

    Step 3 : Generating the XML for Template Design

    Design a OAF Page EmpPG with the Following Code in the Controller EmpCO.

    Write below highlighted code in EmpAMImpl,java file(AM).

    package reddy.oracle.apps.po.xmlreport.server;

    import java.io.ByteArrayOutputStream;

    import oracle.apps.fnd.common.MessageToken;
    import oracle.apps.fnd.framework.OAException;
    import oracle.apps.fnd.framework.OAViewObject;
    import oracle.apps.fnd.framework.server.OAApplicationModuleImpl;
    import oracle.apps.fnd.framework.test.inputscanner.server.EmpVOImpl;

    import oracle.jbo.XMLInterface;

    import oracle.xml.parser.v2.XMLNode;
    // ---------------------------------------------------------------------
    // ---    File generated by Oracle ADF Business Components Design Time.
    // ---    Custom code may be added to this class.
    // ---    Warning: Do not modify method signatures of generated methods.
    // ---------------------------------------------------------------------
    public class XmlReportOAFAMImpl extends OAApplicationModuleImpl {
        /**This is the default constructor (do not remove)
         */
        public XmlReportOAFAMImpl() {
        }

        /**Sample main for debugging Business Components code using the tester.
         */
        public static void main(String[] args) {
            launchTester("reddy.oracle.apps.po.xmlreport.server", /* package name */
          "XmlReportOAFAMLocal" /* Configuration Name */);
        }

        /**Container's getter for XmlReportOAFVO1
         */
        public XmlReportOAFVOImpl getXmlReportOAFVO1() 
        {
            return (XmlReportOAFVOImpl)findViewObject("XmlReportOAFVO1");
        }
        public void intiEMPVO() 
        {
            XmlReportOAFVOImpl vo=getXmlReportOAFVO1();
            
            if(vo == null)
            {
                MessageToken errTokens[] = 
            {
                new MessageToken("OBJECT_NAME", "XmlReportOAFVO1")
            };
                throw new OAException("AK", "FWK_TBX_OBJECT_NOT_FOUND", errTokens);
            }
            else 
            {
                vo.executeQuery();  
            }
        }
        
        public void getEmpDataXML() 
        {
            try 
            {
                ByteArrayOutputStream outputStream = new ByteArrayOutputStream(); 
                OAViewObject vo = (OAViewObject)findViewObject("XmlReportOAFVO1");
                ((XMLNode) vo.writeXML(4, XMLInterface.XML_OPT_ALL_ROWS)).print(outputStream);
                System.out.println(outputStream.toString());
            }    
            catch(Exception e)
            {
                    throw new OAException (e.getMessage());
            }
        }
    }


    Write below highlited code code in CO.

    public void processRequest(OAPageContext pageContext, OAWebBean webBean)
    {
    super.processRequest(pageContext, webBean);
    OAApplicationModuleImpl am= (OAApplicationModuleImpl)pageContext.getApplicationModule(webBean);
    am.invokeMethod("initEmpVO");
    am.invokeMethod("getEmpDataXML");
    }

    Run the page.On running the page , the data xml file will be printed on the Jdeveloper Embeded OC4J Sever Log (since i have used System.out.println). The XML file will be like

    <XmlReportOAFVO>
       <XmlReportOAFVORow>
          <Empno>7369</Empno>
          <Ename>SMITH</Ename>
          <Job>CLERK</Job>
          <Mgr>7902</Mgr>
          <Hiredate>1980-12-17</Hiredate>
          <Deptno>20</Deptno>
       </XmlReportOAFVORow>
       <XmlReportOAFVORow>
          <Empno>7521</Empno>
          <Ename>WARD</Ename>
          <Job>SALESMAN</Job>
          <Mgr>7698</Mgr>
          <Hiredate>1981-02-22</Hiredate>
          <Comm>500</Comm>
          <Deptno>30</Deptno>
       </XmlReportOAFVORow>
       <XmlReportOAFVORow>
          <Empno>7566</Empno>
          <Ename>JONES</Ename>
          <Job>MANAGER</Job>
          <Mgr>7839</Mgr>
          <Hiredate>1981-04-02</Hiredate>
          <Deptno>20</Deptno>
       </XmlReportOAFVORow>
       <XmlReportOAFVORow>
          <Empno>7654</Empno>
          <Ename>MARTIN</Ename>
          <Job>SALESMAN</Job>
          <Mgr>7698</Mgr>
          <Hiredate>1981-09-28</Hiredate>
          <Comm>1400</Comm>
          <Deptno>30</Deptno>
       </XmlReportOAFVORow>
       <XmlReportOAFVORow>
          <Empno>7698</Empno>
          <Ename>BLAKE</Ename>
          <Job>MANAGER</Job>
          <Mgr>7839</Mgr>
          <Hiredate>1981-05-01</Hiredate>
          <Deptno>30</Deptno>
       </XmlReportOAFVORow>
       <XmlReportOAFVORow>
          <Empno>7782</Empno>
          <Ename>CLARK</Ename>
          <Job>MANAGER</Job>
          <Mgr>7839</Mgr>
          <Hiredate>1981-06-09</Hiredate>
          <Deptno>10</Deptno>
       </XmlReportOAFVORow>
       <XmlReportOAFVORow>
          <Empno>7788</Empno>
          <Ename>SCOTT</Ename>
          <Job>ANALYST</Job>
          <Mgr>7566</Mgr>
          <Hiredate>1982-12-09</Hiredate>
          <Deptno>20</Deptno>
       </XmlReportOAFVORow>
       <XmlReportOAFVORow>
          <Empno>7839</Empno>
          <Ename>KING</Ename>
          <Job>PRESIDENT</Job>
          <Hiredate>1981-11-17</Hiredate>
          <Deptno>10</Deptno>
       </XmlReportOAFVORow>
       <XmlReportOAFVORow>
          <Empno>7844</Empno>
          <Ename>TURNER</Ename>
          <Job>SALESMAN</Job>
          <Mgr>7698</Mgr>
          <Hiredate>1981-09-08</Hiredate>
          <Comm>0</Comm>
          <Deptno>30</Deptno>
       </XmlReportOAFVORow>
       <XmlReportOAFVORow>
          <Empno>7876</Empno>
          <Ename>ADAMS</Ename>
          <Job>CLERK</Job>
          <Mgr>7788</Mgr>
          <Hiredate>1983-01-12</Hiredate>
          <Deptno>20</Deptno>
       </XmlReportOAFVORow>
       <XmlReportOAFVORow>
          <Empno>7900</Empno>
          <Ename>JAMES</Ename>
          <Job>CLERK</Job>
          <Mgr>7698</Mgr>
          <Hiredate>1981-12-03</Hiredate>
          <Deptno>30</Deptno>
       </XmlReportOAFVORow>
       <XmlReportOAFVORow>
          <Empno>7902</Empno>
          <Ename>FORD</Ename>
          <Job>ANALYST</Job>
          <Mgr>7566</Mgr>
          <Hiredate>1981-12-03</Hiredate>
          <Deptno>20</Deptno>
       </XmlReportOAFVORow>
       <XmlReportOAFVORow>
          <Empno>7934</Empno>
          <Ename>MILLER</Ename>
          <Job>CLERK</Job>
          <Mgr>7782</Mgr>
          <Hiredate>1982-01-23</Hiredate>
          <Deptno>10</Deptno>
       </XmlReportOAFVORow>
    </XmlReportOAFVO>

    save this XML file in empXml.xml 

    Step 4 : Designing the Template

    Open the Microsoft word. 
    You should be able to see the following menus and toolbars.
    Using the menu Data -> Load XML Data... , load the XML File generated from Jdeveloper

    If the XML files gets loaded successfully, then you should get the below confirmation.
    Using the Table Wizard as below to create the 'Table Report Format' with all the columns of EMP.
    The Table Report Format Template should be like Save the document as Emp.rtf. Preview the report as PDF, XML, HTMl or RTF.

    Step 5 : Registering the Template with Oracle Applications.

    Login with a user having "XML Publisher Administrator" Responsibility.
    Navigate to Home --> Data Definition and define the data definition.
    Navigate to Home --> Template and Define the Template

    Step 6 : Integrating the OAF page With XML Publisher

    Design the EmpPG page to appear as shown below.
    Set the Action Type and Event property of the Tourch Image Item to FireAction and GenerateReport
    respectively. Modify the CO.


    /*===========================================================================+
     |   Copyright (c) 2001, 2005 Oracle Corporation, Redwood Shores, CA, USA    |
     |                         All rights reserved.                              |
     +===========================================================================+
     |  HISTORY                                                                  |
     +===========================================================================*/
    package reddy.oracle.apps.po.xmlreport.webui;

    import javax.servlet.http.HttpServletResponse;

    import oracle.apps.fnd.common.VersionInfo;
    import oracle.apps.fnd.framework.server.OAApplicationModuleImpl;
    import oracle.apps.fnd.framework.webui.OAControllerImpl;
    import oracle.apps.fnd.framework.webui.OAPageContext;
    import oracle.apps.fnd.framework.webui.beans.OAWebBean;

    import java.io.ByteArrayInputStream;
    import java.io.ByteArrayOutputStream;
    import javax.servlet.ServletOutputStream;

    import oracle.apps.fnd.framework.OAException;

    import oracle.apps.fnd.framework.server.OADBTransactionImpl;
    import oracle.apps.xdo.oa.schema.server.TemplateHelper;

    import oracle.cabo.ui.data.DataObject;

    import oracle.xml.parser.v2.XMLNode;


    /**
     * Controller for ...
     */
    public class XmlReportOAFCO extends OAControllerImpl
    {
      public static final String RCS_ID="$Header$";
      public static final boolean RCS_ID_RECORDED =
            VersionInfo.recordClassVersion(RCS_ID, "%packagename%");

      /**
       * Layout and page setup logic for a region.
       * @param pageContext the current OA page context
       * @param webBean the web bean corresponding to the region
       */
       
       private static final String APP_NAME = "PO";
       private static final String TEMPLATE_CODE = "XMLOAFREPORT";
       
      public void processRequest(OAPageContext pageContext, OAWebBean webBean)
      {
        super.processRequest(pageContext, webBean);
        OAApplicationModuleImpl am= (OAApplicationModuleImpl)pageContext.getApplicationModule(webBean);
        am.invokeMethod("intiEMPVO");
        am.invokeMethod("getEmpDataXML");
      }

      /**
       * Procedure to handle form submissions for form elements in
       * a region.
       * @param pageContext the current OA page context
       * @param webBean the web bean corresponding to the region
       */
      public void processFormRequest(OAPageContext pageContext, OAWebBean webBean)
      {
        super.processFormRequest(pageContext, webBean);
        OAApplicationModuleImpl am= (OAApplicationModuleImpl)pageContext.getApplicationModule(webBean);
        
        String event = pageContext.getParameter("event");  
        
          if("GenerateReport".equals(event))
          {
              // Get the HttpServletResponse object from the PageContext. The report output is written to HttpServletResponse.
              DataObject sessionDictonary = (DataObject)pageContext.getNamedDataObject("_SessionParameters");
              HttpServletResponse response = (HttpServletResponse)sessionDictonary.selectValue(null,"HttpServletResponse");
              try 
              {
                    ServletOutputStream os = response.getOutputStream();
                    
                    // Set the Output Report File Name and Content Type
                    
                    String contentDisposition = "attachment;filename=EmpReport.pdf";
                    response.setHeader("Content-Disposition",contentDisposition);
                    response.setContentType("application/pdf");
                    
                    // Get the Data XML File as the XMLNode
                    XMLNode xmlNode = (XMLNode) am.invokeMethod("getEmpDataXML");
                    ByteArrayOutputStream outputStream = new ByteArrayOutputStream();
                    xmlNode.print(outputStream);
                    ByteArrayInputStream inputStream = new ByteArrayInputStream(outputStream.toByteArray());
                    ByteArrayOutputStream pdfFile = new ByteArrayOutputStream();
              
                    //Generate the PDF Report.
                   
                   TemplateHelper.processTemplate(
                  ((OADBTransactionImpl)pageContext.getApplicationModule(webBean).getOADBTransaction()).getAppsContext(),
                  APP_NAME,
                  TEMPLATE_CODE,
                  ((OADBTransactionImpl)pageContext.getApplicationModule(webBean).getOADBTransaction()).getUserLocale().getLanguage(),
                  ((OADBTransactionImpl)pageContext.getApplicationModule(webBean).getOADBTransaction()).getUserLocale().getCountry(),
                  inputStream,
                  TemplateHelper.OUTPUT_TYPE_PDF,
                  null,
                  pdfFile);
            
                    // Write the PDF Report to the HttpServletResponse object and flush.
                    byte[] b = pdfFile.toByteArray();
                    response.setContentLength(b.length);
                    os.write(b, 0, b.length);
                    os.flush();
                    os.close();
              }
              catch(Exception e)
              {
                    response.setContentType("text/html");
                    throw new OAException(e.getMessage(), OAException.ERROR);
              }
                    pageContext.setDocumentRendered(false);
              }
          }

      }

    Run the EmpPG page and click on the tourch icon. 
    The File Download window appear. Click on the Open Button to view the report.

    AME (Approval Management Engine)

    AME (Approval Management Engine) : AME Stands for Oracle Approval Management Engine. AME is a self service web application that enables...