Wednesday, July 31, 2019

Sequential Numbering


Sequential numbers are used to assign the unique numbers to various Business Transactions. 
The businesses Transaction are Journals, Invoices, Payments, Sales Invoices and Receipts.

Step 1:-Set Sequential Number profile option at system administrator Responsibility.

Navigation:-Profile >System


Select the Responsibility Name “XYZ General Ledger”


Profile Name is “Seque%number%


Click on the “Find”


Assign the profile options at Responsibility Level “Partially Used” save and close the form.


Note: - There are three profile options available

(a)    Partially Used:-If we select this profile options, it’s an optional one. If sequential number is there it will consider other wise it will give a message like there no sequential number for this category. It will not stop the process.

(b)    Always Used:-If we used this profile options, It’s a Mandatory profile option, With out sequential number it will not allow to create transaction. It will stop the process.

(c)     Not Used:-If we used this profile option. We are not using sequential number feature.


Step 2:-Define the Document sequential Number.

Navigation:-Setup>Financial>Sequences>Document>Define


Enter the Name “XYZ Bank Payments”
Select the Application Name “General Ledger”
Enter the From Date “01-Jan-2013
Enter the Initial Value “13140001”
Save and close the form.


Step 3:-Category has defined already
Navigation:-Setup>Journal>Category


Click on the “F11”
Enter the XYZ% and click on the “Ctr+F11”


We have defined the categories already.


Step 4:-Assign the Sequential Number to Category.
Navigation:-Setup>Financials>Sequences>Document>Assign


Define the Manual also


Select the Application Name is “General Ledger”
Select the Category Name is “XYZ Bank Payments”
Select the Ledger Name is “XYZ Primary Ledger”
Select the Method is “Automatic”
Click on the “Assignment”


Define the Manual Assignment also.


Enter the Start date is “01-Jan-2013”
Select Sequence name from list of values
 Save and close the form.

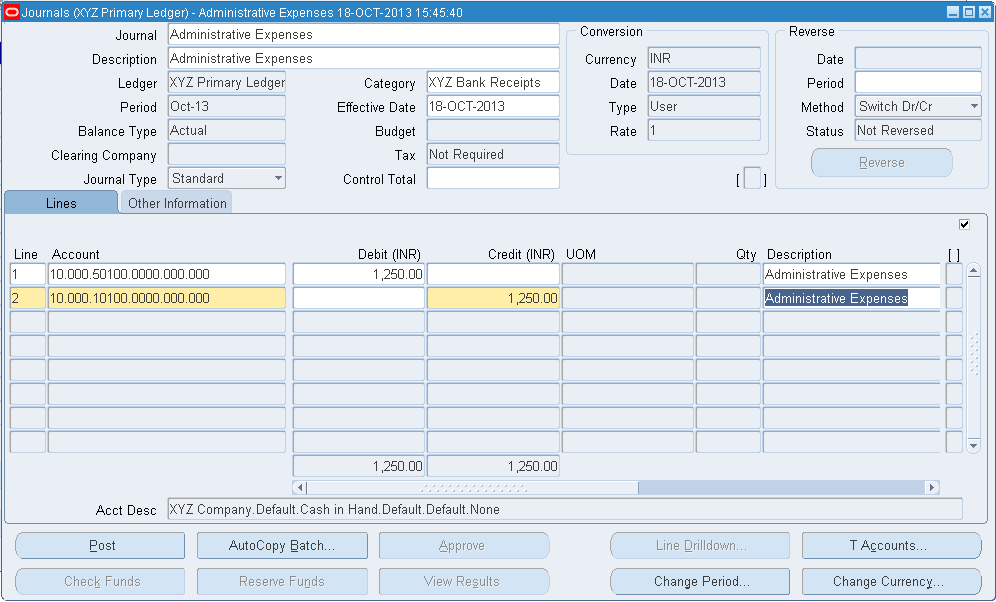
Step 5:-Create one journal and verify the Sequential number

Navigation:-Journal>Enter


Enter the Journal Name
Select the Category which we defined sequential number.
Enter the Lines details.
While saving the journal system will generate the Sequential number.
Click on “ok”


Document Number is” 131400001”

Auto-Reversal

Auto Reversal Feature is used to reverse the journals automatically. 
Generally we can use this function for month end adjustments.


Step 1:-Define the Auto-Reversal Criteria Set
Navigation:-Setup>Journal>Auto-Reversal


Enter the Criteria Set and below details.


Enter the criteria set name and then save the data.
Click on the “Yes”


After save the all categories will display by default.
Find the category which you want set for auto-Reversal. 
Click on F11 and entered XYZ%


Click on the  “Ctr+F11”


Select the category for Auto-reversal “XYZ Adjustments”


Select the Reversal Period is “Next Non-Adjusting”
Reversal Date is “First Day”
Check the “Auto Reverse”
Check the “Auto-Post Reversal”
Save and close the form.


Step 2:-Assign the Auto Reversal Criteria Set to Primary Ledger
Navigation:-Setup>Financials>Accounting Setup Manager>Accounting Setup


Click on the “Go”


Click on the “Update Accounting Options”


Click on the “Update” XYZ Primary Ledger


Click on the “Next”


Assign the Journal Reversal Criteria Set. Click on the . select from list of values.


After select the click on the “Finish”

Step 3:-Create one journal post it.

Navigation:-Journal>Enter


Enter the Journal name
Select the category from list of values
Enter the debit & credit lines
Click on the “Post” journal

Step 4:-Run the “Program - Automatic Reversal”

Navigation:-View>Request>Submit New Request”


Click on the “ok”
Click on the “submit”


Step 5:-Query the auto reversal in Nov-13 Month.
Navigation:-Journal >Enter


Enter the Nov-13 Month.

Click on the “Find”


Auto Reversal Journal has been in month of Nov-13.


Auto Posting Journals

Auto posting feature is used to post the Journals automatically by system itself instead of posting journals manually.


Step 1:-Define the Auto-posting Criteria Set
Navigation:-Setup>Journal>Auto-Post


Enter the Criteria Set Name, Enter the Ledger Name, Source, Category and Period.


Save and Close the form.

Note:-We can schedule this concurrent program as per client program.


Step 2:-Create one un-posted journal with the “XYZ Bank Receipts”


Enter the above details and save the journal and close the form.


Step 3:-Run the “Program - Automatic Posting” Program.
Navigation:-View>Request>Submit New Request


Select the Auto-post criteria Set and click on the “OK”
Click on the “Submit”


Verify the Concurrent Programs
Navigation:-View>Request>Find


Step 4:-Query the Journal and verify whether posted automatically or not?
Navigation:-Journal >Enter


Enter the Journal Name “%Administrative Expenses%”
Click on the “Find”


Journal has been posted automatically.


Suspense Journals

Using Suspense Journal feature, we can post the unbalanced journal also. 
While posting the journal system will verify the Debit & Credit balance is not equal. 
Automatically system will add one set-off line for difference amount. 


Step 1:-Assign the Suspense account at Primary Ledger level.
Navigation:-Setup>Financial>Account Setup Manager>Accounting Setup


Enter the Primary Ledger
Click on the “Go”


Click on the “Update Accounting Options”


Click on the “Update”


Click on the “Next”


Enter the “Suspense Account”


Click on the “Finish” and Close form.


Step 2:-Define the Suspense account Rules.

Navigation:-Setup>Account>Suspense


Select the Primary Ledger
Select the Sources and Category
Select the account also.


After entered the above data Save and Close the form.


Note:-The above we have selected Source and Category is “Other”. That means its applicable any source and category.


Step 3:-Define the one Unbalance journal and post it.

Navigation:-Journal >Enter


The journal line 1 Debit having 1200 and Line 2 Credit is 1000.There is difference between Debit and Credit 200.

Save and Click on the “Post”


Click on the “Yes”

After complete the Concurrent program verify the journal

Step 6:-Query and Verify the Suspense set off line.
Navigation:-Journal>Enter


Click on the “Find”


Click on the


System automatically added Suspense set-off line by default.

you can see 200 Difference with Suspense Account.


AME (Approval Management Engine)

AME (Approval Management Engine) : AME Stands for Oracle Approval Management Engine. AME is a self service web application that enables...